Learn how to build and install a DIY bat house to attract helpful, insect-eating bats to your yard.
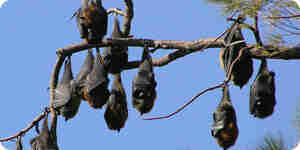
Many people are afraid of bats, associating them with Halloween, vampires, and haunted houses. So why would anyone want these creatures in their yard? For starters, most bats are insectivores, meaning they eat the real bloodsuckers: mosquitoes. One bat can eat up to a thousand mosquitoes in an hour. Bat guano is also great for the soil. Bats usually make their homes in trees, but due to forests being cleared, they need alternative places to roost. Much like a birdhouse, a bat house can be made from wood. However, unlike birdhouses, bat houses are very narrow, and the opening is located at the bottom. Below are instructions on how to build a bat house.
Required Materials
- Plywood
- Mesh
- Paint
- Caulk
- Screws
- Screwdriver
- Staples
- Jigsaw
First, use a jigsaw to mark and cut the plywood into two 24x14-inch pieces. One will serve as the front and the other as the back. Cut the front panel into two sections, designating one as the top front and the other as the bottom front. When assembled, this will create a ventilation gap. Roughen the interior of the top and back pieces with a knife or saw to provide the bats with footholds.
Next, make the sides, which will create the space between the front and back. They need to be 24 inches long and 2 inches thick to give the bats enough room. Using a caulk gun, apply adhesive to attach the sides to the back panel. Use a drill to drive in screws and hold the structure together more securely.
Paint the interior of the bat house a dark color; black is preferred. Paint the exterior a color that blends in with its surroundings. For example, if you plan to hang it on a red barn, paint it red; if you hang it on a tree, paint it brown.
Before attaching the front panels, add mesh or netting to the bottom front piece using a staple gun. This will give the bats better grip.
To attach the front panels, apply caulk to the side pieces and place the top front and bottom front pieces half an inch apart to allow for ventilation. Drive several screws through the front panels to secure them to the sides.
Once the caulk and paint are dry, you can hang your bat house on a house, post, barn, or tree. It needs to be mounted at least 15 feet high and face either south or southeast to receive enough sunlight to keep the bats warm.
You may not see bats right away, so be patient. Bats usually look for new homes in the spring, so it is best to hang the house at the end of winter. It may take up to a year to attract bats, but once your new guests arrive, you will quickly see why they are so beneficial.
How to Build a Bat House
Learn how to build and install a DIY bat house to attract helpful, insect-eating bats to your yard.
Many people are afraid of bats, associating them with Halloween, vampires, and haunted houses. So why would anyone want these creatures in their yard? For starters, most bats are insectivores, meaning they eat the real bloodsuckers: mosquitoes. One bat can eat up to a thousand mosquitoes in an hour. Bat guano is also great for the soil. Bats usually make their homes in trees, but due to forests being cleared, they need alternative places to roost. Much like a birdhouse, a bat house can be made from wood. However, unlike birdhouses, bat houses are very narrow, and the opening is located at the bottom. Below are instructions on how to build a bat house.
Required Materials
- Plywood
- Mesh
- Paint
- Caulk
- Screws
- Screwdriver
- Staples
- Jigsaw
First, use a jigsaw to mark and cut the plywood into two 24x14-inch pieces. One will serve as the front and the other as the back. Cut the front panel into two sections, designating one as the top front and the other as the bottom front. When assembled, this will create a ventilation gap. Roughen the interior of the top and back pieces with a knife or saw to provide the bats with footholds.
Next, make the sides, which will create the space between the front and back. They need to be 24 inches long and 2 inches thick to give the bats enough room. Using a caulk gun, apply adhesive to attach the sides to the back panel. Use a drill to drive in screws and hold the structure together more securely.
Paint the interior of the bat house a dark color; black is preferred. Paint the exterior a color that blends in with its surroundings. For example, if you plan to hang it on a red barn, paint it red; if you hang it on a tree, paint it brown.
Before attaching the front panels, add mesh or netting to the bottom front piece using a staple gun. This will give the bats better grip.
To attach the front panels, apply caulk to the side pieces and place the top front and bottom front pieces half an inch apart to allow for ventilation. Drive several screws through the front panels to secure them to the sides.
Once the caulk and paint are dry, you can hang your bat house on a house, post, barn, or tree. It needs to be mounted at least 15 feet high and face either south or southeast to receive enough sunlight to keep the bats warm.
You may not see bats right away, so be patient. Bats usually look for new homes in the spring, so it is best to hang the house at the end of winter. It may take up to a year to attract bats, but once your new guests arrive, you will quickly see why they are so beneficial.
How to Build a Bat House
By Howtodotips
Learn how to build and install a DIY bat house to attract helpful, insect-eating bats to your yard.